
Building the Ultimate Handheld Skyrim: Getting Started Modding on the Steam Deck
From fresh install on your SD card to your first mods, this guide will get you going on your Skyrim tinkering journey.
Update: While Mod Organizer 2 is specialized for Fallout and Elder Scrolls games, it is capable of managing mods for other games using a plugin. The article has been updated with the correction.
Skyrim is over a decade old, but in spite of that Skyrim Special Edition at the time of writing has a 24-hour peak player count of just over 31,000. In contrast, the much more recent Elder Scrolls Online MMORPG has a Steam 24-hour peak player count of 18,000. With player numbers like that a decade later, it’s no wonder Bethesda released the $50 Anniversary Edition compiling a ton of user created content and…fishing? The true reason for its longevity is not the countless re-releases over the years, but in fact one of the most vibrant modding communities in all of gaming.
Modding Skyrim has evolved over the game’s life. Now with the Steam Deck becoming some people’s first PC gaming experience, you might want to see the Macho Man Randy Savage Dragons for yourselves. The trouble is that all the modding tools out there are for Windows, so getting up and running may not be so simple to those unfamiliar with Linux and tools like Wine and Lutris.
I’ve seen a few videos and posts covering this and a lot of times it boils down to, “Just copy your files from your PC and call it a day”. I’m not a fan of this answer because it gives you no way to locally manage your mods on your Steam Deck. Believe me when I tell you being able to change mod configurations quickly is important if you truly go down the modding rabbit hole.
This guide is aimed at newcomers who might have bought the 64GB Steam Deck and want their games on an SD card. What this guide is not is an in-depth guide of every aspect of every modding tool out there. I can only cover so much in one guide so I’m focusing on those new to modding.
For this guide we will be using Skyrim Special/Anniversary Edition but this will work for any single player Elder Scrolls or Fallout game. Take note that if you're doing this with the original version of Skyrim you will need to check if a mod requires specific DLC, otherwise it will crash your game.
Choosing the Right Mod Manager: Vortex vs Mod Organizer 2
Back in the early days when you wanted to mod your games, you’d download mods off a random forum site and slap ‘em into the game data folder. If your game broke, whelp guess you need to reinstall the whole thing. However, talented mod developers have created mod managers to simplify the installation process that give you some better ways to manage said mods without the risk of nuking the original game files. People have their preferences for mod managers but the two big ones for Skyrim are Vortex Mod Manager and Mod Organizer 2. They accomplish similar things in different ways but also each have their own strengths and weaknesses.
Vortex Mod Manager is the official mod manager released by Nexus Mods, the largest modding website, and can handle modding pretty much any game listed on their website. While it can handle managing multiple games, it does not have as powerful tools as Mod Organizer 2 does. Mod Organizer 2 is a specialized mod manager that was designed to managing most games from the Elder Scrolls and Fallout series however it's compatibility can be expanded to other games using a plugin. The advantage is since it’s specialized it can do things like managing hundreds of mods much easier.
For this guide I will be using Vortex Mod Manager for two reasons. One: Mod Organizer needs to be open in order to run your mods. This makes it take longer to get into game which is not great for a handheld console. Plus you’re also dealing with multiple windows which can be a little annoying at times. Two: Vortex is a very popular mod manager and learning how to use it will enable you to mod other games if you want.
Your mileage will vary as I haven’t tested all these games, but you won’t have to worry about downloading additional programs to put in No Man Sky mods for example. If the idea of completely rebuilding Skyrim from the ground up with hundreds of mods excites you, then Mod Organizer is probably what you want to look at. If you just want to get your feet wet and want to stay under, say 50 mods, Vortex is a good starting point.
Prepping your Steam Deck
Before we get to Vortex and installing mods, we need to get your Steam Deck and Skyrim prepped. For this guide I’m assuming you’ve installed Skyrim Special Edition on your SD card, however this will still work if you’ve installed it on your internal SSD drive. I would recommend it being installed on the SSD drive if you have the space due to how many loading screens you encounter in Skyrim, but again I want this guide to work as well for the 64GB Steam Deck as it does for someone that upgraded to a 2TB drive.
Before You Launch Skyrim
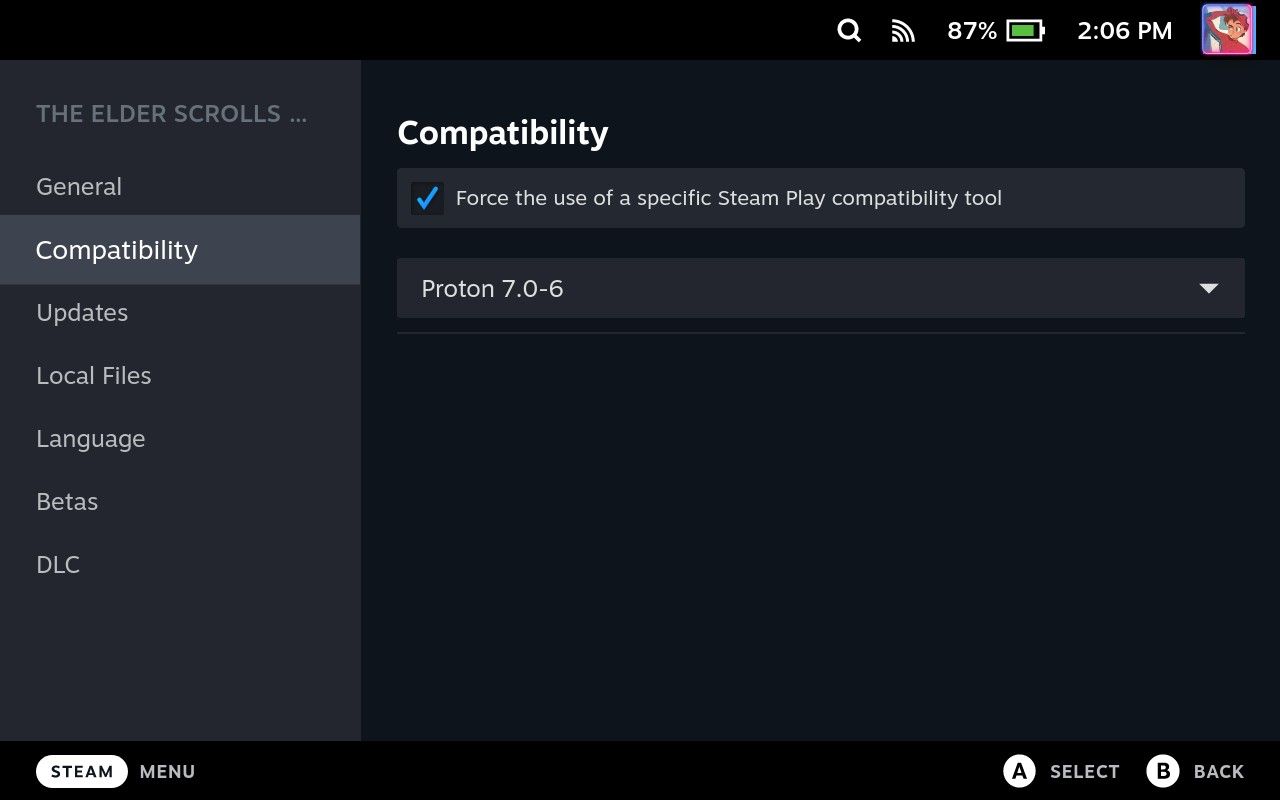
Once you have it installed, you’ll need to make sure you have the right version of Proton installed. Go up to the search bar and type in Proton to see all the available versions of Proton that are officially available. I’m using Proton 7.0-6 for this. After that’s downloaded and installed you need to go to Skyrim Special Edition in your library and select the Gear Icon to bring up additional options. Head to Properties and then select the Compatibility tab. Check the Force the use of a specific Steam Play compatibility tool option and select Proton 7.0-6 in the drop down.
Back out and launch the game. This will bring up Skyrim’s Launcher and from here we’ll want to go to Options to change the graphics to High since the Launcher likes to set the default to Ultra. Hit Play and let the game load up to the main menu. After that, we’re safe to close out of the game.
Installing Lutris and SKSE in Desktop Mode
We’ll need to jump over to the desktop for the rest of this guide so I highly recommend a mouse and keyboard along with an external display. Once you’re at the desktop, open the Discover Store and search for Lutris. This wonderful program lets us install many Windows games and tools not available on Steam. Install it and close out of the store as we’ll come back to it later.
Open up your web browser and head over to the SKSE website. SKSE aka the Skyrim Script Extender is the backbone for a lot of more advanced mods. For the Special Edition and Anniversary Edition we’ll want to download the latest Anniversary build (there are also versions for other versions of Skyrim as well as a Fallout Script Extender if you're looking to mod a Fallout game). Extract that to your downloads and open the folder. You will see several files but we only need to focus on three items: skse64_[the current version].dll, skse64_loader.exe, and the Data folder. Open Steam and right click Skyrim and go to Manage and then Browse local files. This will open the root folder of Skyrim. Drag the three previous files mentioned and place them into Skryim’s root folder. You’ll be asked to merge the Data folder so make sure you accept that.
At this point SKSE is installed, but we are going to do one additional thing. Rename SkyrimSELauncher.exe to something like OGSkyrimLauncher.exe and then rename skse_loader.exe to SkyrimSELauncher.exe. What this does is tells Steam to launch Skyrim with the Script Extender whenever you hit play. If you ever need to get back to the Skyrim Launcher just reverse the rename process and launch the game again.
One last step to finish preparing your Steam Deck to install Vortex. In your file explorer go to the root of your SD card and create a new folder. Call it something like Vortex Mod Staging. This will be needed later on.
Installing Vortex
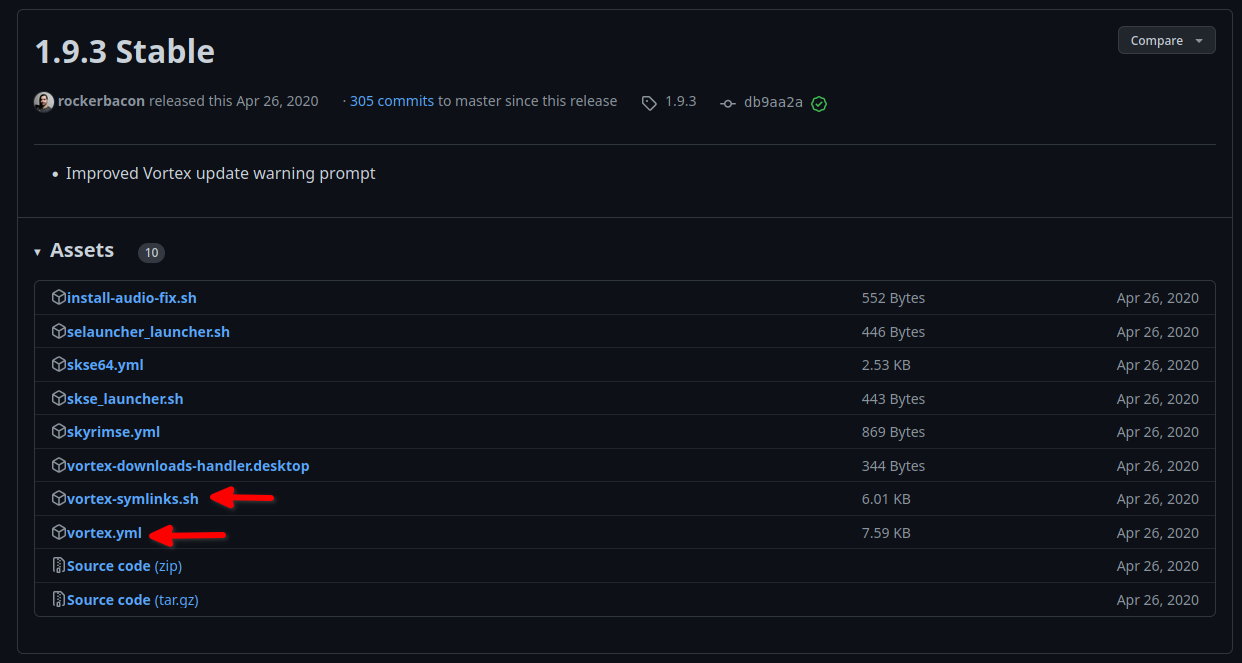
Remember Lutris from earlier? This is where it comes into play. Head back to your web browser and head over to this GitHub link to download the needed files. This project is dedicated to streamlining the install process of Mod Organizer 2 on Linux, but they have a Vortex Lutris install script which will work. This is what I used to install Mod Organizer if you wanted to go that direction but, again, we’re sticking with Vortex in this guide. Download the vortex-symlinks.sh and vortex.yml.
Once those are downloaded, go into your Downloads folder and right click an empty space and select Open Terminal Here to open the Konsole focused on your Downloads folder. Now for some the terminal is scary but we only need to type two commands for this entire guide and I’ll explain them. First, we need to edit the vortex-symlinks.sh file because otherwise the installation of Vortex will fail. To do this we will type the following command:
sed -i s/^xdg/#xdg/ vortex-symlinks.sh
This command makes the vortex-symlinks.sh script compatible with the Steam Deck by disabling two xdg commands. Once that’s done we can now begin the install process, but we need to launch it through the terminal. Type the following command to begin installing Vortex:
flatpak run net.lutris.Lutris -i ~/Downloads/vortex.yml
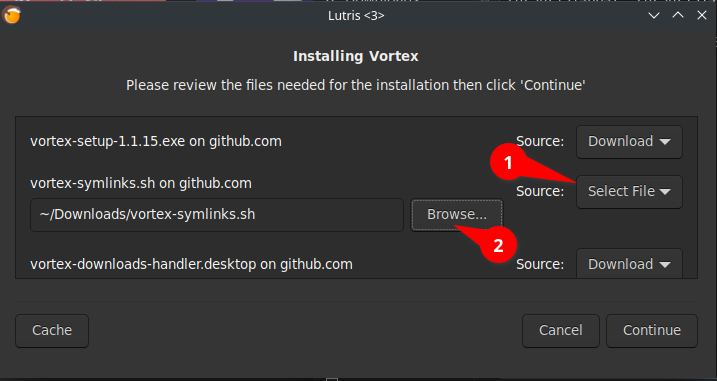
A Lutris window called Install Vortex will then pop up. Go ahead and click the Install button. It will show where it will be installed along with checkboxes of creating shortcuts. The important thing to note is making sure Vortex is installed on the same drive as Skyrim. I also recommend at least creating a desktop shortcut as I had problems with the application menu shortcut on my Deck. Once things look good click Install and it will show you the needed files which will have dropdown menus that say Download on. One of those will be vortex-symlinks.sh on github.com. You want to click that dropdown and click Select file (1). You’ll then see a Browse (2) button appear with that we’ll select the vortex-symlinks.sh from earlier. Once the file is selected you can hit Continue.
This will kick off the installation process during which you will see Wine pop-ups asking to install components. Click install to all of those to continue the process. Once you’ve clicked through all of the pop-ups you might think the install crashed or froze. Don’t panic, please be patient. For me installing to my SD card took around 15 minutes so just take a nice little break from tinkering.
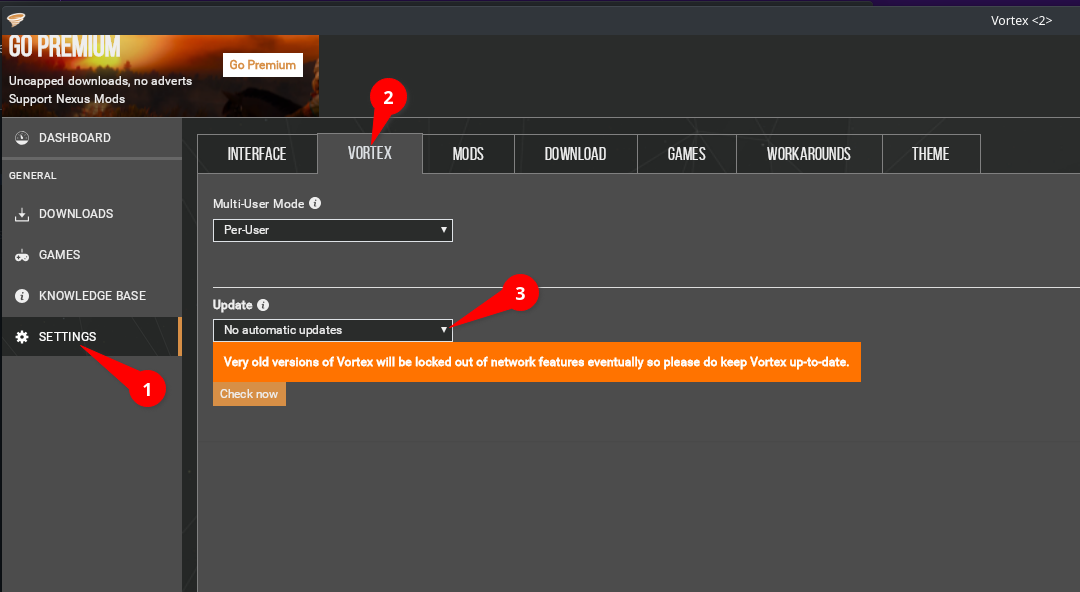
Around 15 minutes you’ll see a new Lutris window called Manual Step Required. This is to let you know that Vortex is going to try to automatically update itself, which will screw up the install. What you need to do is disable your Wi-Fi/disconnect your Steam Deck from the internet before continuing. Once your Steam Deck is offline, click the dropdown menu to select that you have indeed disconnected and click to continue. Vortex will now open for the first time. From here you’ll need to click on Settings (1) and then Vortex (2) to find the auto update option. Under Update click the dropdown and select No automatic updates (3). At this point it’s safe to close out of Vortex and reconnect your Steam Deck to the Internet. Lutris will then say the installation is complete.
Preparing Vortex
Now we can finally work with Vortex. Open Vortex back up with the desktop shortcut we made. If you didn't make one, that's ok. If you open Lutris you will see all your applications you installed with Lutris, including Vortex. From here we can launch and manage the install. Once Vortex is opened we need to make sure it is managing our Skyrim mods. Click on the Games (1) tab and scroll down until you see Skyrim Special Edition. Click the + icon (2) and Manually set location (3).
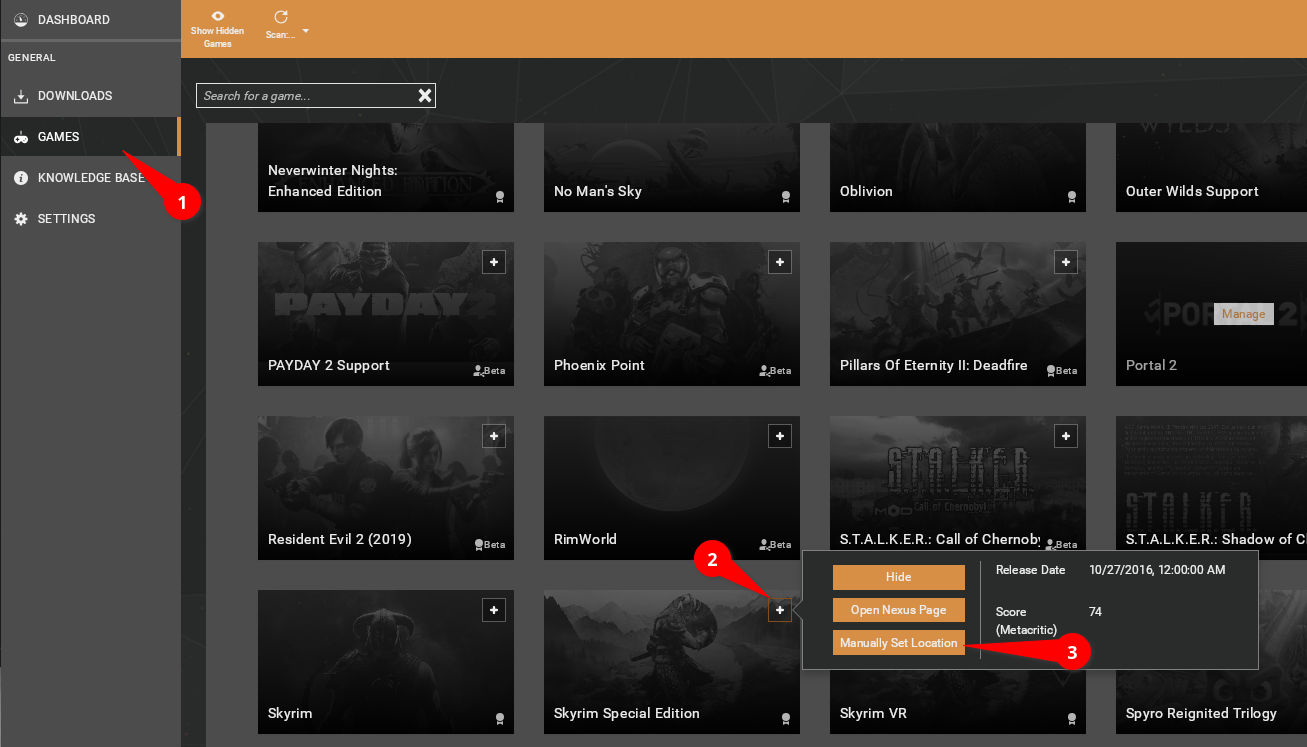
This will open a file browser where you'll select the Skyrim game folder. If you installed Skyrim on your SD card then you'll click on My Computer > (E:) > steamapps > common and then select the Skyrim Special Edition folder. If you installed the game on your internal SSD then you will need to go My Computer > (Z:) > home > deck > .steam > steam > steamapps > common and then select the Skyrim Special Edition folder. Once the game folder path is set you can click the Manage button that has now appeared in the center of the Skyrim Special Edition image to begin managing that game’s mods.
Required Step for SD Card Installation
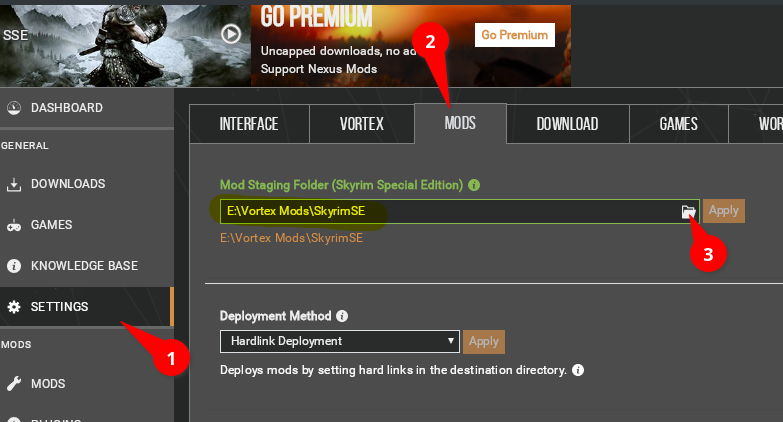
I have found that with Skyrim installed to my SD card, if I tried installing mods at this point they would fail to install properly. The reason for this seems to be related to where the mod staging folder is located which by default is the SSD. If you have Skyrim on your internal SSD then you can skip this step.
From Vortex's Settings (1) page click Mods (2) to see the Mod Staging Folder location. From here we're going to click the folder icon (3) to choose a new folder location. Remember the Vortex Mod Staging folder we created? We'll navigate to that by clicking My Computer > (E:) and then select the Vortex Mod Staging folder we created from earlier. This will prevent Vortex from failing to install mods properly.
Installing Your First Mod
Now we're finally ready to start modding. For this example we're going to use a mod that is required by a lot of other mods you'll find, SkyUI. Not only that but this will help test if SKSE is running correctly. With how Vortex is currently configured we unfortunately cannot download the mod directly with the Vortex Mod Manager. Instead we have to manually download the mod in our browser. Once the mod archive file is downloaded, we're going to go to Vortex's Mods page. This will be a list of all mods stored inside Vortex. At the bottom we will see a box to add mod files to Vortex. Just drag and drop the mod file you downloaded into that box at the bottom. This will import the mod into Vortex but not install the mod.
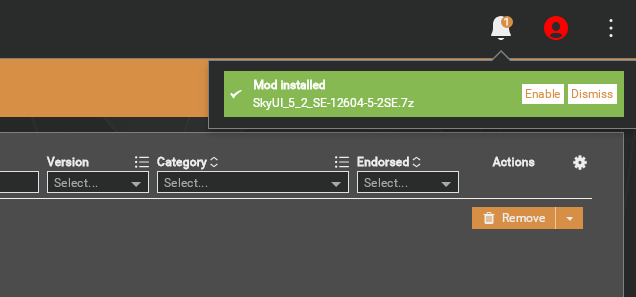
We'll see SkyUI appear on the Mods page. Click the Install button to have Vortex install the mod to Skyrim. Once SkyUI is installed you will see a pop-up with an option to enable the mod. Go ahead and click that. Shortly after you'll see another pop-up with the option to deploy the mod. Go ahead and click that too. Finally click on the Plugins page. You will see a spinning wheel for a while so just be patient. This is finalizing mod installation. Once you see a list you’re good to close out of Vortex. You’ll need to open the Plugins page before quitting Vortex every time you enable or disable mods.
Congrats, you've installed your first mod. If you've installed Skyrim to your SSD you can now launch Skyrim from Steam and see if SKSE and SkyUI are running properly. If they don't, then follow the next Required Step for SD Installation instructions.
Required Step for SD Installation
Normally at this point you would be ready to dive into a modded Skyrim. Unfortunately this was not the case for me during my testing. After a while I figured out that Vortex was not putting needed files into the right folders to enable the mods. Those needed files are the plugins.txt and loadorder.txt.
The plugins.txt is a list of all the enabled mods (typically ending in .esp or .esm) and tells Skyrim what mods should be loaded. The loadorder.txt is a file that tells Skyrim what order the mods should be loaded as loading some mods before others can cause the game to crash. Vortex has ways to automatically sort mods and there are dedicated tools like LOOT that help you figure out your load order. For more information about the plugins.txt and loadorder.txt files and how they interact with Skyrim, you can check out this page in LOOT's documentation.
The issue here is that the way we've set up Vortex causes Vortex to write the updated plugins.txt and loadorder.txt files in the wrong folder. We could simply copy and paste these files into the correct folder. However, since Vortex will write the update files to the wrong folder, you would have to copy and paste these two files every time you made changes to your enabled mods or load order.
We can fix this issue by creating a symbolic link (symlink) inside of the folder Skyrim expects the files to be in. This is much like a desktop shortcut to a folder, but it works a bit differently. Skyrim will see the symbolic link as a folder no different from the original directory. This way when Vortex updates the plugins.txt and loadorder.txt files, Skyrim will see the updated files automatically without us having to intervene.
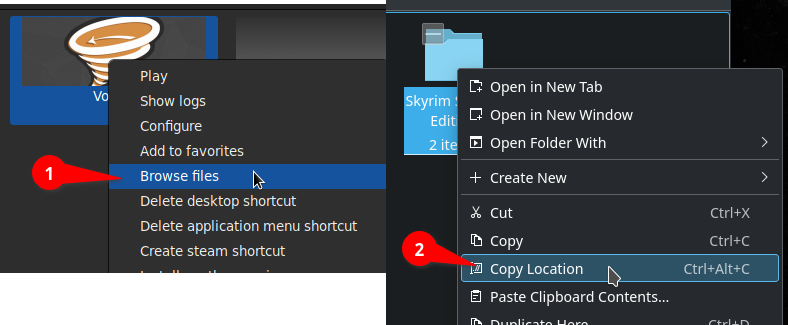
First open Lutris and right click Vortex and select Browse files (1) to open up the installation folder of Vortex. From here click on drive_c > users > deck > Local Settings > Application Data where you will find a Skyrim Special Edition folder. This folder contains the plugins.txt and loadorder.txt. we need Skyrim to read. Right click the Skyrim Special Edition folder and select Copy Location (2). Now navigate to the following folder: Home > deck > .steam > steam > steamapps > compatdata > 489830 > pfx > drive_c > users > steamuser > AppData > Local.
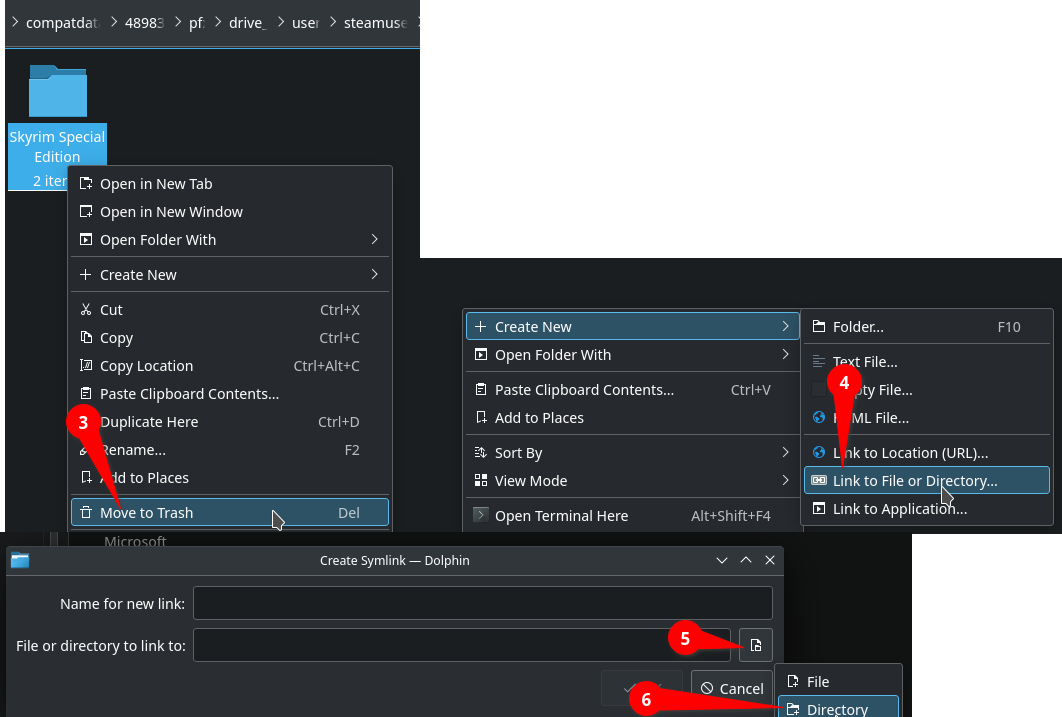
NOTE: The .steam folder is hidden so you will need to click Show Hidden Files in the menu by clicking the hamburger (3 lines) button on the right next to the magnifying glass icon.
In this folder you will also see a Skyrim Special Edition folder.
This is where Vortex needs to place those text files. In the window we just opened, delete the Skyrim Special Edition folder (3). Then right click an empty space and select Create new > Link to File or Directory (4). This will open a Create Symlink window. Click the small button above the cancel button (5) and then Directory (6).
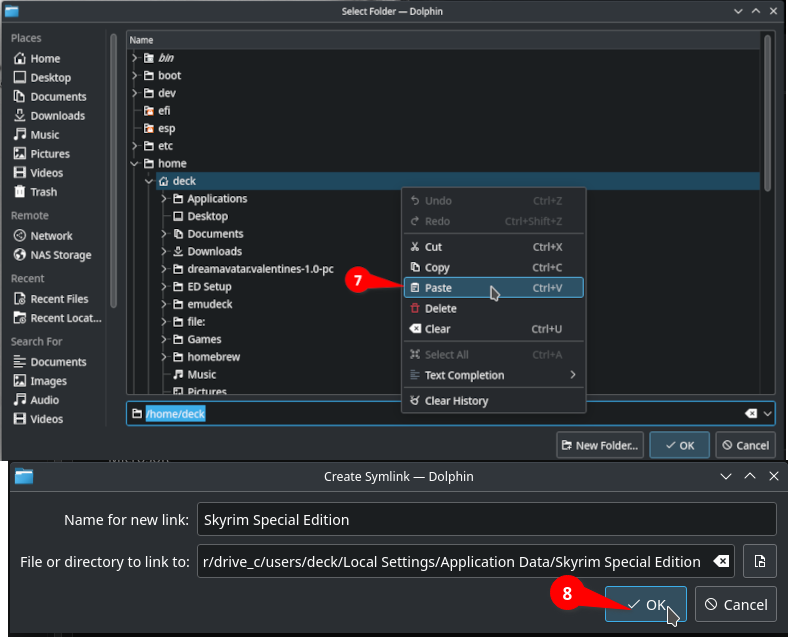
In this new window clear everything in the bottom address bar and right click and paste to paste in the location of the Skyrim Special Edition folder (7) that was in your Vortex folder and hit OK. The Name for new link should already be filled in as Skyrim Special Edition, if not go ahead and type that in and then click OK (8). Skyrim will now be looking for the plugins.txt and loadorder.txt inside of the folder Vortex is writing the updated text files to.
Congrats, you’ve installed your first mod. Now click play on Skyrim’s Steam page and you should see it bypass the Skyrim Launcher to go directly to the game. Load up a save and open your inventory. If it looks radically different then you’ve got both SKSE and SkyUI running correctly. There’s more to the Vortex Mod Manager but this guide is running long as it is so I’ll just recommend Gopher’s Vortex playlist. It is five years old, but he really digs deep into Skyrim/Fallout modding.
Venture Forth Into The Nexus
You’re now prepared to shape Skyrim into whatever you desire. I would like to point out a few mods I find to be essential no matter how you intend to play Skyrim:
Unofficial Skyrim Special Edition Patch
This mod fixes a ton of bugs and ends up being required by some other mods out there. I install this straight after SkyUI every time.
Static Mesh Improvement Mod - SIMM
This greatly improves many 3D models throughout Skyrim. I honestly have a hard time remembering what the vanilla models look like because I’ve used this in all my playthroughs.
A Quality World Map
A highly detailed 3D map or you can download the paper map. These maps are intended to better display Skyrim’s roads, either only the main roads or all roads.
Alternate Start - Live Another Life SSE
The opening of Skyrim is entertaining precisely once. Every time after is a long drawn out slog. With this mod you immediately create your character, answer a few questions who your character is, and poof! You're anywhere you want to be in Skyrim. One time I started in the middle of the woods with nothing but the clothes on my back. Then a werewolf attacked. I won.
So was this guide helpful? What mods will you be installing on your Steam Deck? What’s your craziest Skyrim story? Let us know in the comments down below!


Comments ()