
From Discs to Deck: Discover the Easy Way to Rip Your Blu-Rays for the Steam Deck
Sure it’s awesome to play games on the Steam Deck, but did you know you can rip and watch your Blu-Rays all from the Deck?

Let’s imagine a scenario where you’ve exhausted your game backlog and want to tackle your movie backlog. I know, impossible to imagine but hear me out. A friend finally got around to giving you a copy of their indie project on Blu-Ray and you decide to add the digital file to you device to help you through a flight back home.
You of course can’t watch it in your hotel room because hotels make sure you can’t get to the HDMI ports on your room’s TV. Not a huge deal, all you need to do is drag and drop the file onto the device, but it turns out the friend only has the Blu-Ray and not a digital version for whatever reason. Whether it’s because the friend is the sound guy and doesn't have the finished file or lost the file, you’re without a way to get the film digitally.
Well perhaps you can another way. You can use a program to rip the movie off the disc with any computer available, including the Steam Deck. As much as I tout the Steam Deck as my favorite console, this is very much a, “it’s a PC” moment to do some wacky but useful stuff.
Even if you don’t intend to use your Steam Deck for this, it is incredibly useful to be able to make your own digital copies of your Blu-Rays and this guide can help you understand how to do it even on your home PC. I am throwing in some fun extra stuff for the Steam Deck, but for the first part we’re going to walk through how to actually get your movie off the disc.
Required Hardware
First the prerequisite of getting an external Blu-Ray player. When it comes to standard Blu-Rays this part is pretty easy. There doesn’t seem to be special requirements to rip standard Blu-Rays, you just need an external drive that can read Blu-Rays. This is the first Blu-Ray drive I used to start ripping my collection if you’d like to be certain you’re buying a drive that will work.
When it comes to 4K/UHD Blu-Rays that’s an entirely different beast. You need to either buy the correct UHD Blu-Ray drive that will work out of the box, one of the UHD Blu-Ray drives that can be flashed with custom firmware, or a pre-flashed UHD drive. All three of these options are going to be more expensive than a standard Blu-Ray drive for standard Blu-Rays, but if you’re the kind of person thinking about ripping your 4K HDR Blu-Ray collection I don’t think you’re too worried about that. I went with the first option and managed to find a repaired Pioneer BDR-XD07UHD drive off eBay for just under $100. Unfortunately that seems to have been a needle in a haystack for that price so you might have to do your own research with the help of the MakeMKV forum post on the matter.
The second prerequisite is plugging in your drive to your Steam Deck. If you have an external drive with a USB-C cable, congrats you can stop here. If you’ve purchased one with USB-A cables, then you’ll need an adapter or hub. Previously I highlighted my hub that I use when traveling which you can read in my Steam Deck EDC article. There’s no special requirement with this so you can use the official Steam Deck Dock or just a $30 hub you can take with you in a bag. Pick whatever suits your needs and situation best.
Setting Up Required Software
Now that we have all the hardware out of the way, let’s get into the software we’re going to need. We’re going to download a few bits of software from the Discover Store. Three programs in total which are MakeMKV, Handbrake, and Kodi (more on this one later).
Once those three are downloaded we need to do two quick things in the terminal. We need to set a sudo password if you haven’t already, and we need to give MakeMKV access to the external drive. Open the Konsole and type the following to set the sudo password:
passwd
It’ll ask you to enter a new password. You won’t see anything as you type but just type the password you want and hit enter. It’ll say the password was successfully updated and you’ll be good. Please do not forget this password as it’ll be important for future tinkering. Once that’s done we just need to type the following:
sudo modprobe sg
It will ask you for your sudo password and then you’ll be done. What the modprobe command does is load modules (a.k.a. drivers) we specify (in this case sg which access to disc drives) into the kernel. This is not the same thing as unlocking the file system (which I recommend against). No Steam Decks were harmed in the making of this guide. At this point we’re ready to pop in our disc and let it rip.
Ripping Our Disc with MakeMKV
Plug in your drive before you open MakeMKV, otherwise it won’t detect the drive. Once you open MakeMKV it will ask you to either purchase a key or register a key. It’s alright because there is a beta key you can grab off the official MakeMKV forums intended to test the program while it’s in its “beta phase”. I do not know how long the beta phase will last but it has been in beta for quite a while so it’s a safe bet you can use MakeMKV for free now. Alternatively you can outright purchase it for $50 so you don’t have to check back for a beta key every month or so. I did and don’t regret it considering just how many discs I’ve ripped into my Plex server.
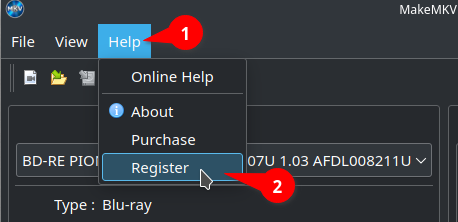
To register the beta key (or a purchased key) click on Help (1) and then Register (2). This will open a window to enter your key. Once you do that you’re free to rip your disc.
Now we could go straight to ripping our disc, and there’s a good chance everything will be fine. However we can get just a bit more functionality out of MakeMKV if we install the Java Runtime Environment.
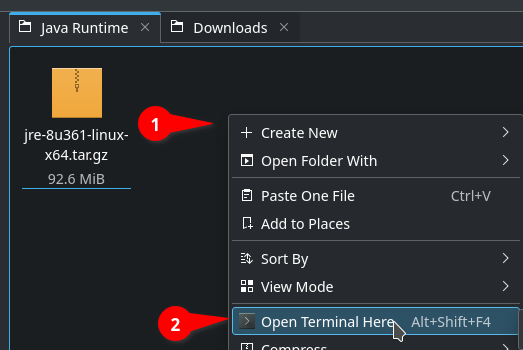
Luckily this doesn’t require modifying the system files, but we will need to tell MakeMKV where to find the install path. Head over to the Java Runtime Environment (JRE) Download page and download the Linux x64 version. You’ll also see a link for instructions which will be handy, but I’m going to go through them here as well. Once the file is downloaded open your file explorer and go to your Home folder. Here let’s make a new folder called Java Runtime. Drag the downloaded JRE file inside this new folder. Once you’re inside the Java Runtime folder, right click a blank space (1) and click Open Terminal Here (2) in the right click menu. This will open your Konsole back up but focused inside this folder.
We’re going to type the following command from the JRE install instructions:
tar zxvf jre-8u73-linux-x64.tar.gz
This will unpack JRE inside the folder. Once that’s completed you can delete the file you downloaded inside the Java Runtime folder. (Note that if you have a later release of Java, the filename may be different than in the above command.)
Let’s go back to MakeMKV to tell it where our JRE install is located. In MakeMKV click on View and then Preferences. In the window that pops up click on the second to last tab and then under Custom Java executable location click the button with the paper icon (2).
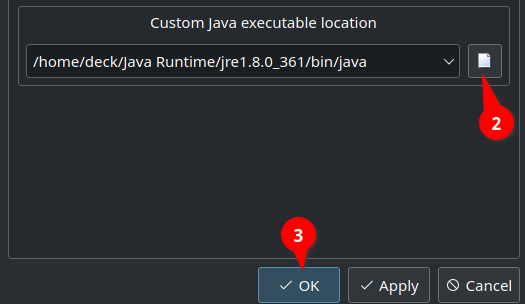
This will open up a file explorer window to locate the Java executable. If you followed the file structure I gave in the example above it will be as follows.
Home > Java Runtime > jre[current version] > bin > java
Once you’ve selected it go ahead and hit OK (3). Once this is set we can move onto ripping your disc. Insert your Blu-Ray disc and click on the Blu-Ray drive button (1). This will open our Blu-Ray and scan the files on the disc.

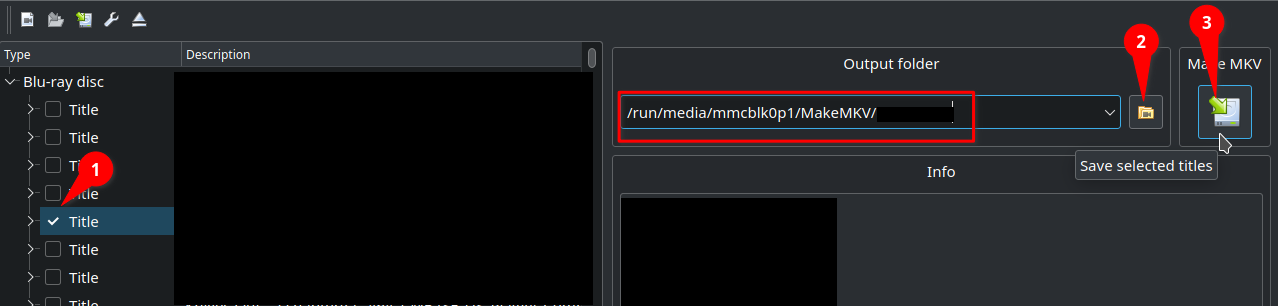
By default MakeMKV selects every file it finds so we want to make sure we unselect those. Right Click the selected files and click Unselect All from the right click menu. Once we have a blank slate, click on the Main Feature/largest file in the list (1) to select that to rip. Then we want to make sure it’s going somewhere with plenty of space, like our SD card. Click the Folder icon (2) next to the output field and navigate to a folder on your SD card where you want the movie to save to. Once you’ve selected that go ahead and click the Make MKV button (3) to begin the ripping process.
Slimming Down our Video with Handbrake
Now we have our movie saved to our Steam Deck. One thing you’ll notice is the movie is extremely large (somewhere between 20G - 60GB). Games already take up so much space so let’s take that size down a bit. Handbrake is a fantastic free tool I’ve used for converting and compressing videos for years. There’s a ton of options here and honestly what I recommend may not be ideal for everyone.
One thing to note is the codec that we can use during this compressing process. When I’m on my desktop with processing power to spare I go for H.265 as it is a newer codec that offers better compression. In this case we may want to choose H.264 instead as it requires less processing power and that’s the one area the Steam Deck is a little lacking. In my example photos you’ll see I selected H.265 and this led to the compression process taking seven hours. That time would’ve been cut by half if I had chosen H.264.
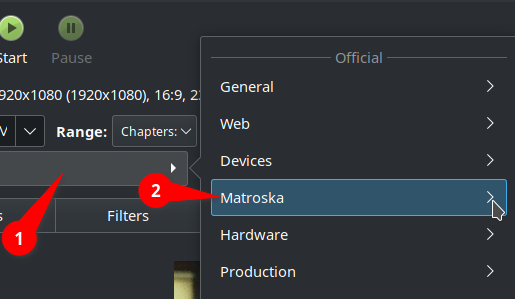
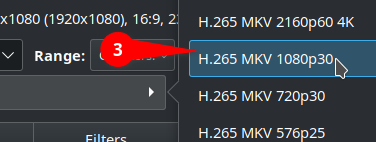
These settings are one that work for me, but different types of media will look better with different settings (live action compared to animation and so on). First you want to Open the File and select the ripped video. Once it’s loaded in we want to select our preset (1). You can go through and see if any sound like ones you might want but for me I select Matroska (2) and then from here pick H.264 MKV 1080p30 (3) if you’re using a Steam Deck or H.265 MKV 1080p30 (3) if you’re using a more powerful computer.
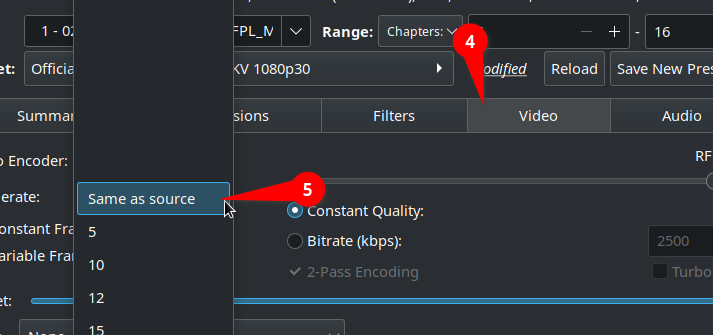
At this point if you’re in a hurry you can just start the compression, but there’s a few settings I like to dial in, namely audio. First click on the Video tab (4) and under Framerate I always select Same as source (5).
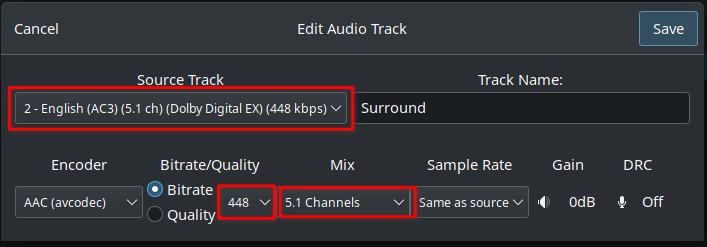
Then click on the Audio tab (6) and click the pencil icon to the right of the audio track (7). This is what the audio will be converted to in terms of how many channels and the bitrate.

By default Handbrake will convert audio to a stereo channel which is fine for our Steam Deck or headphones, but I like 5.1 surround because that’s what I have in my living room. The settings you pick are up to you and your needs, but you should match those settings up with the correct channels and bitrate. In this example we can see the Source Track has the bitrate in the name so we can set our bitrate to match along with the Mix channels. There was a 7.1 surround track and a 2.0 stereo track in the video file so again this is more of what you want. The only thing you really need to keep in mind is the more channels your video has, the higher the bitrate needs to be.
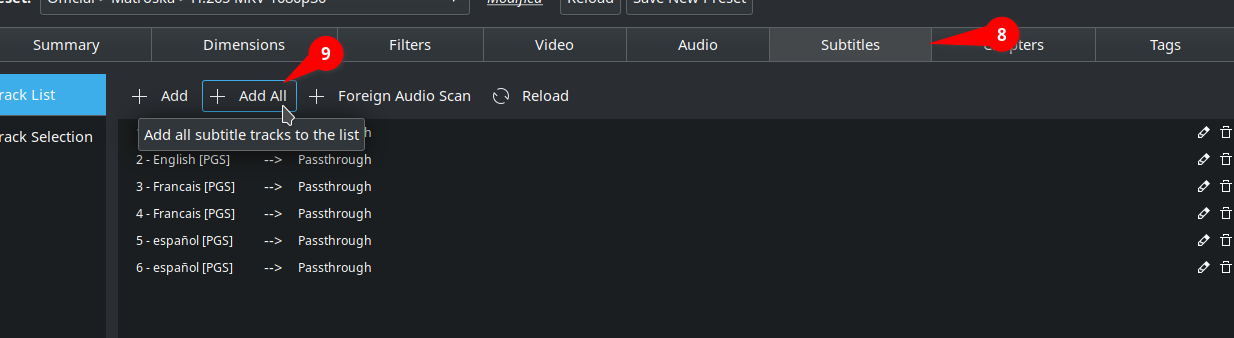
Finally let’s click on the Subtitles tab (8) to add in the subtitles you want. This is optional but I like having subtitles in my video files because I know my partner prefers them turned on. I simply click Add All (9) but you can click the Add button to select individual subtitle tracks.
The final step is to set our export location and name the file. Click on the Dropdown menu on the right of the Save As bar and select Other…(10) In the window navigate to where you want it to go (probably your SD card again) and hit OK. Click on the Save as address bar (11) to rename the file to something more readable.

Remember to not change the .mkv file extension at the end. A good practice in naming your movies is to do the name followed by year in parentheses and then what quality the movie is. For our example the name I went with was:
Friend's Indie Project (2023) - 1080p.mkv
Once you’ve named the file, you’re good to hit Start. This process will take a while so make sure you plug your Steam Deck into power and just take a break. Again since I went with H.265 for my test it took seven hours. Once it’s done you’ll have one slimmed down movie ready for viewing on your Steam Deck.
Turning Your Deck into a Entertainment Center
Now it’s all great that you ripped your Blu-Ray to your Steam Deck, but remember you’ve got a plane to catch. (Well, that’s if we’re still abiding by my hyper-specific conceit from earlier) You don’t want to mess around with desktop mode on the plane. You want to just open the movie from the default interface and if you get bored bounce to Vampire Survivors because that’s just what you do. Maybe you’ve connected your Steam Deck to a friend’s TV to watch said Blu-Ray rip but you don’t have a good way to control the movie from the couch. This is where Kodi comes in.
Formerly known as XBMC, Kodi is an interface that pulls in all your entertainment content and allows you to navigate with a remote or controller with ease. You can import media from external drives, network attached storage, or even other services like YouTube or Plex using plugins. It’s a fantastic program that I only scratched the surface of myself but know enough to help you turn your Deck into a pocket Apple TV.
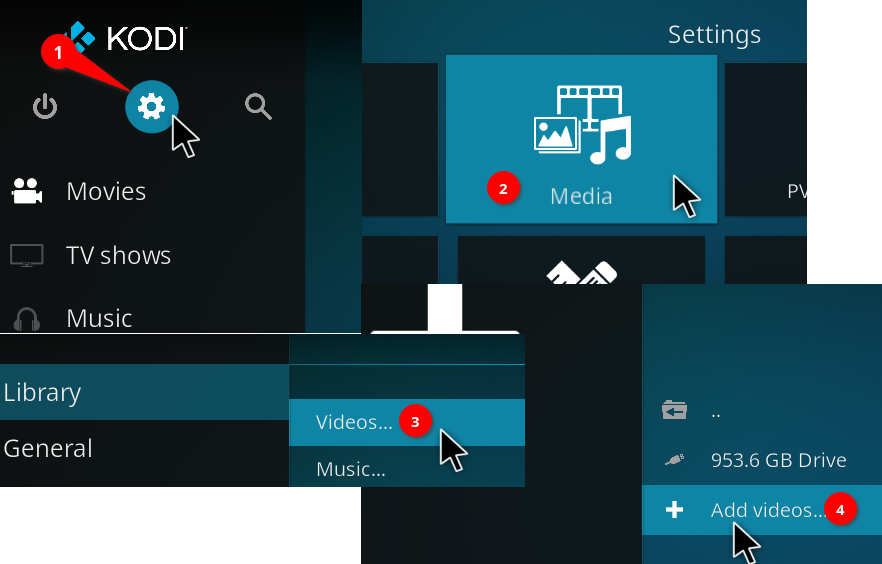
Open Kodi and you’ll see the full screen main interface. Right now there’s no content but you will notice if you use your Steam Deck controls it will navigate through Kodi. Perfect for on the go or paired with a Bluetooth controller great from the couch. Let’s head over to the settings by selecting the Gear icon (1) at the top left. From there you’ll see a number of tiles for categories of settings. We want to go to the Media (2) category which will take us to the Library Section. Click on the Videos…(3) option and then Add videos…(4) to open our file browsing window. We’ll want to select the folder where we’re storing our movies.
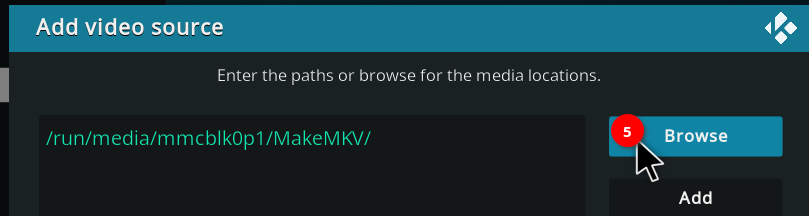
Kodi will search through folders recursively so just selecting the folder where I have Our Friend's Indie Project folder will find the movie. If you’ve stored your movies or shows on your SD card you’ll want to navigate through the root filesystem Like this:
run > media > mmcblk0p1 > [The folder where you’ve saved your videos]
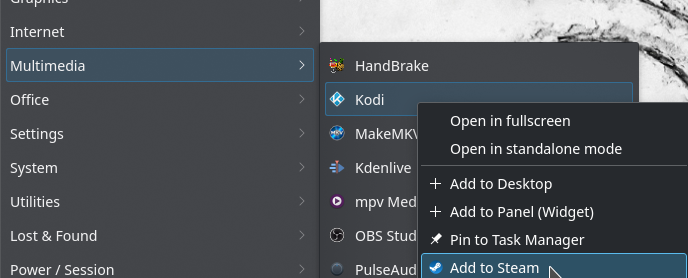
Once you’ve done that go ahead and click OK. This will then open a window to specify what type of media is in this folder. If it’s movies, pick Movies, shows, pick TV Shows, etc. After you select the type of media you’re importing, just hit OK to finish. Kodi will ask if you’d like to refresh your library so go ahead and do that. Kodi will then scan and add the content from your folder complete with artwork and information. One last thing to do is add Kodi to Steam. Just close out of Kodi by selecting the Power icon and Exit. Then in your applications menu go to Multimedia and right click Kodi and select Add to Steam.
You’re now ready to watch your physical non-copy protected Blu-Ray collection anywhere your Steam Deck goes! Adding Kodi certainly gives the Steam Deck a modern PSP feel to it. I’ll be using Kodi to play movies at a friend's house that can’t access my Plex server, or if I can manage to get to an HDMI port in a hotel.
So are you going to be trying this with your Steam Deck? Do you have a big Blu-Ray collection? What’s your must have streaming service? Like I said I'm a big Plex user, but I also love Dropout and YouTube. Let us know in the comments down below!

Comments ()